

Recording The Presentation
Click Here For Adobe PDF Printer Friendly Version
The Presentation Creation and Recording feature of Synergy Room is very powerful, yet simple to use.
Synergy Room records all voice, public text messages, slides and whiteboard events. This feature captures everything that happens in your conference room and makes it easy to create your own rich multimedia web presentations. These presentations may be placed on your website and viewed on demand by your visitors.
Synergy Room presentations can be fully experienced in any browser that supports Java applets, such as FireFox, Safari or Internet Explorer. The audio portion of a presentation can also be heard in any MP3 player.
- Turn on recording
Pull down the File menu and select Record Presentation, or just press Alt+R

- Select the destination folder
Enter a folder name in which to save your recording, e.g. SalesMeetingDecember2006

- Recording in Progress
While recording is in progress all audio, public text messages, browser navigations and whiteboard events will be recorded.
Note the letter R in a yellow circle beside Alice's name, indicating that she is recording:

- Timing is Everything!
Timing of the playback is controlled by the audio portion of the recording.
This means that if 5 seconds of audio was recorded between two slides, then the playback will have a 5 second delay between the slides.
However, if no audio is recorded between the changing of slides, then playback of those slides will happen at the same time, with the result that only the last slide will appear.
Therefore, it is necessary to record some audio between consecutive slides to establish the delay.
- Stop Recording
Notice that you may Pause Recording or Resume Recording at any time by tapping Alt+P.
When the presentation has ended, turn off recording by pulling down the File menu, and again selecting Record Presentation, or simply tap Alt+R.
- Recording Complete
Every recorded presentation consists of several files including a generated web page, compressed audio, a player applet, and image files from the presentation.
The name of the folder changes depending on the name you provided when recording was initiated, however, the individual files contained in the recording always have the same names:
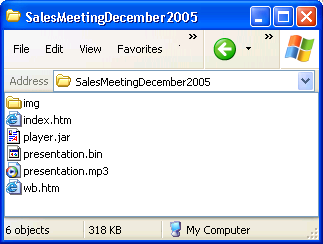
File Name File Description index.htm web page used to start playback wb.htm helper web page player.jar java player applet presentation.bin recorded data presentation.mp3 MP3 audio (Windows only) img Image files - Replay
To begin playback, simply open the index.htm file in your Java enabled browser. For best results, we recommend the latest version of the FireFox web browser. Note the MP3 link in the bottom left corner of the page.

Note: Java version 1.3 or later is required to play back a presentation. Where required Java support is not present, only the MP3 recording will be available.
If the presentation player does not appear as shown above, visit http://java.com and make sure that you have the latest version of the Java plugin.
For best results, we recommend Mozilla FireFox as your web browser for playing presentations.
- Upload
You may now upload the completed presentation to your website.
When uploading recordings to the web, upload the entire presentation folder, including all files.
In this example, upload SalesMeetingDecember2006 to your website, and begin playback by accessing the URL:
http://www.yoursite.com/SalesMeetingDecember2006/
© 2006 iVocalize Ltd. All rights reserved.